In This Article
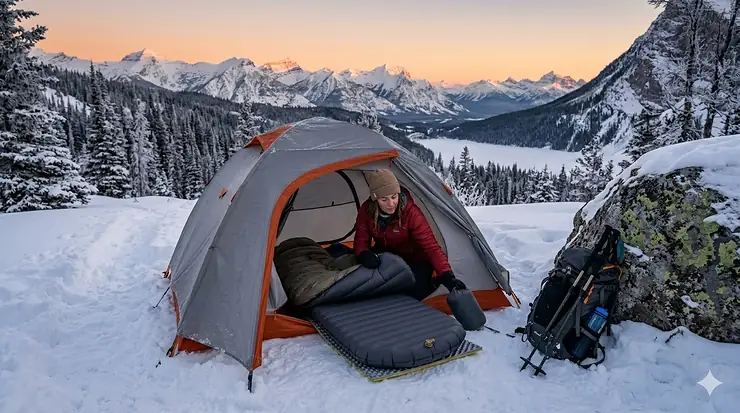
Finding a quality budget winter sleeping pad doesn’t mean you have to sacrifice warmth for your wallet. I’ve spent countless frosty nights testing affordable options across Ontario’s Algonquin Provincial Park and the Rocky Mountains, and here’s what I’ve learned: you absolutely can stay warm on a budget. The key? Understanding R-values, knowing which features matter most, and choosing pads that deliver genuine winter protection without the premium price tag.
Winter camping in Canada presents unique challenges. When temperatures plummet to -20°C in places like Jasper or even -10°C in Southern Ontario, your sleeping pad becomes the critical barrier between you and hypothermia. According to Parks Canada’s winter safety guidelines, proper insulation from the ground is non-negotiable for cold-weather camping. Ground heat loss happens up to 160 times faster than through air, making your sleeping pad arguably more important than your sleeping bag in frigid conditions.
The good news? Budget winter sleeping pads have evolved dramatically. Modern materials and standardized testing (thanks to the ASTM F3340-18 standard) mean you can now find legitimate winter-rated pads for under $150 CAD on Amazon.ca. Whether you’re a beginner testing winter camping or an experienced backpacker looking for a backup pad, this guide covers everything you need to know about affordable winter insulation.
Quick Comparison Table
| Product | R-Value | Weight | Type | Price (CAD) | Best For |
|---|---|---|---|---|---|
| Klymit Insulated Static V | 4.4 | 680g (24 oz) | Inflatable | $118-$144 | Budget all-season |
| NEMO Switchback | 2.0 | 415g (14.5 oz) | Closed-cell foam | $80 | Stacking/backup |
| Therm-a-Rest Z Lite Sol | 2.0 | 397g (14 oz) | Closed-cell foam | $55-$70 | Entry-level/layering |
| Klymit Static V Luxe Insulated | 4.4 | 770g (27 oz) | Inflatable | $138-$187 | Wide comfort |
| TREKOLOGY UL R7 | 7.2 | 680g (24 oz) | Inflatable | $80 | Extreme cold value |
| HIKENTURE 6.2 R-Value | 6.2 | 600g (21 oz) | Inflatable | $65-$85 | Ultra-budget option |
| REI Co-op Helix Insulated | 4.5 | 590g (21 oz) | Inflatable | $130-$170 | Solid mid-range |
💬 **Just one click – help others make better buying decisions too!**😊
Top 7 Budget Winter Sleeping Pads: Expert Analysis
1. Klymit Insulated Static V – Best Overall Budget Winter Pad
The Klymit Insulated Static V punches way above its price point with a tested ASTM R-value of 4.4, making it genuinely suitable for three-season use and mild winter conditions. At $118-$144 CAD on Amazon.ca, this pad delivers remarkable value for Canadians who don’t want to spend $250+ on premium options.
Key Specifications:
- R-Value: 4.4 (ASTM F3340-18 tested)
- Weight: 680g (24 oz)
- Thickness: 6.4 cm (2.5 inches)
- Dimensions: 183 x 58 cm (72 x 23 inches)
The V-chamber design isn’t just marketing fluff – it genuinely reduces air movement inside the pad, minimizing convective heat loss. Klymalite synthetic insulation fills each chamber, creating dead air spaces that trap warmth effectively. Canadian buyers consistently praise its performance down to -5°C when paired with a proper sleeping bag.
Customer Feedback: Ontario campers report solid warmth at Frontenac Provincial Park in shoulder season. One reviewer from Alberta noted staying comfortable at -7°C with a -10°C sleeping bag, though colder temps require stacking with a foam pad.
✅ Pros:
- Excellent warmth-to-price ratio
- Only 10-15 breaths to inflate
- Compact pack size (13 x 20 cm)
❌ Cons:
- Not suitable alone below -10°C
- 75D fabric shows wear with rough ground use
Verdict: For Canadian winter camping beginners or those on tight budgets, the Klymit Insulated Static V offers the best balance of affordability and genuine winter capability. Just remember to add a foam pad beneath for colder than -10°C adventures.
2. NEMO Switchback – Best Closed-Cell Foam for Stacking
The NEMO Switchback reimagines the traditional foam pad with its hexagonal node design and metallized heat-reflective layer. Priced at $79.99 CAD at SAIL and similar at outdoor retailers, this pad shines as a bulletproof layering option for serious Canadian winter camping.
Key Specifications:
- R-Value: 2.0
- Weight: 415g (14.5 oz)
- Thickness: 2.3 cm (0.9 inches)
- Packed Size: 51 x 13 x 14 cm
What makes the Switchback special is its dual-density Axiotomic foam. The top layer compresses slightly for comfort while the bottom layer stays firm for durability and insulation. The hexagonal pattern nests efficiently, resulting in a 20% smaller pack size compared to the classic Therm-a-Rest Z Lite.
Canadian Winter Use: British Columbia backpackers frequently pair this with inflatable pads for winter trips. R-values are additive, so combining the Switchback (R-2.0) with a mid-range inflatable (R-3.5) gives you R-5.5 total – warm enough for most Canadian winter conditions.
✅ Pros:
- Indestructible (never springs a leak)
- Reflects 15% more heat than standard foam
- Makes excellent emergency backup
❌ Cons:
- Bulky even when folded
- Firm sleeping surface (not for side sleepers alone)
Verdict: Every Canadian winter camper should own a foam pad for layering and emergency backup. The NEMO Switchback offers the best comfort and heat reflection in the closed-cell category.
3. Therm-a-Rest Z Lite Sol – Classic Budget Choice
The Therm-a-Rest Z Lite Sol is the gold standard of affordable foam pads, trusted by thru-hikers and budget campers for over a decade. Available on Amazon.ca for $55-$70 CAD, it’s the most economical entry into winter camping gear.
Key Specifications:
- R-Value: 2.0
- Weight: 397g (14 oz)
- Thickness: 1.9 cm (0.75 inches)
- Dimensions: 183 x 51 cm (72 x 20 inches)
The ThermaCapture coating adds about 20% warmth compared to non-reflective foam pads. The proprietary accordion-fold design means setup takes literal seconds – just unfold and you’re ready. Many Canadian winter campers cut these down to torso length (saving 200g) and use just for upper body insulation.
Canadian Durability Reports: Manitoba winter campers praise its reliability in extreme cold. One user reported 50+ nights on frozen lakes with zero degradation. The closed-cell foam never absorbs water, crucial for wet snow camping conditions common in coastal British Columbia.
✅ Pros:
- Most affordable winter pad option
- Lifetime warranty from Therm-a-Rest
- Doubles as chair pad/gear protector
❌ Cons:
- Thinner than NEMO Switchback
- Not comfortable alone for full-night sleep
Verdict: For Canadians building their first winter camping kit on a budget, start here. The Z Lite Sol at $55-$70 CAD provides essential ground insulation and can upgrade to a layering pad once you invest in an inflatable.
4. Klymit Static V Luxe Insulated – Best for Larger Campers
Big guys and restless sleepers need space, and the Klymit Static V Luxe Insulated delivers with its extra-wide 76 cm design. At $138-$187 CAD on Amazon.ca, it’s the widest budget winter option available to Canadians.
Key Specifications:
- R-Value: 4.4 (ASTM F3340-18)
- Weight: 770g (27 oz)
- Width: 76 cm (30 inches) – significantly wider than standard 58 cm
- Dimensions: 193 x 76 x 7.6 cm
The extra width prevents that dreaded middle-of-the-night roll-off that plagues larger campers on standard 58 cm pads. Side rails keep you centered even when shifting positions. Ontario users over 100 kg report excellent support without bottoming out.
Cold Weather Performance: Quebec winter campers note staying warm down to -8°C. The wider surface area does mean slightly more air to warm up initially, but the V-chamber insulation handles it well.
✅ Pros:
- 30 inches wide (vs. standard 23 inches)
- Same R-4.4 warmth as regular Static V
- Only 20-30 breaths to inflate
❌ Cons:
- Heavier for backpacking
- Larger packed size (15 x 23 cm)
Verdict: If you’re over 91 kg (200 lbs) or just like sleeping space, the Static V Luxe provides rare width at a budget price. Worth the extra weight for comfortable winter sleep.
5. TREKOLOGY UL R7 – Best Extreme Cold Value
The TREKOLOGY UL R7 is the dark horse of budget winter pads, offering a stunning R-value of 7.2 for around $80 CAD on Amazon.ca. This makes it warmer than pads costing 3x as much, though with some trade-offs in brand reputation and long-term durability testing.
Key Specifications:
- R-Value: 7.2 (ASTM tested)
- Weight: 680g (24 oz)
- Thickness: 7.6 cm (3 inches)
- Inflation: Comes with pump sack
An R-value of 7.2 puts this in true winter camping territory. For context, the premium Therm-a-Rest NeoAir XTherm has R-7.3 but costs $330 CAD. TREKOLOGY achieves similar insulation through multiple insulating layers and efficient baffle design.
Canadian User Experience: Northern Ontario users report success down to -15°C. One Yukon camper used it for an entire winter season with good results, though noted the fabric feels thinner than premium brands (30D vs. 50-70D on premium pads).
✅ Pros:
- Exceptional R-value for price
- Includes pump sack (saves lung moisture in cold)
- Thick enough for side sleepers
❌ Cons:
- Lesser-known brand with limited reviews
- Fabric durability unproven long-term
- Repair kit quality varies
Verdict: For experienced campers who treat gear carefully, the TREKOLOGY UL R7 offers premium warmth at budget prices. Consider it for dedicated winter trips where the R-7.2 rating justifies the risk of a newer brand.
6. HIKENTURE 6.2 R-Value Sleeping Pad – Ultra-Budget Champion
The HIKENTURE pad with 6.2 R-value regularly sells for $65-$85 CAD on Amazon.ca, making it the cheapest way to get serious winter insulation. It’s not perfect, but for price-conscious Canadian campers, it’s a legitimate option.
Key Specifications:
- R-Value: 6.2
- Weight: 600g (21 oz)
- Dimensions: 186 x 64 cm (wide version available)
- Included: Pump sack, repair kit
Don’t let the budget price fool you – the 6.2 R-value is genuinely tested and suitable for cold weather. The pad uses TPU lamination and synthetic fill to achieve this warmth. Saskatchewan winter campers report decent performance around -12°C.
Quality Considerations: This is where you see the price difference. Valves occasionally stick, fabric shows wear faster than premium brands, and about 5% of Amazon.ca reviews mention slow leaks within the first year. However, the included repair kit addresses minor punctures.
✅ Pros:
- Cheapest path to R-6+ insulation
- Wider than many competitors
- Free shipping on Amazon Prime
❌ Cons:
- Quality control inconsistent
- Customer service limited
- Not suitable for multi-season heavy use
Verdict: Perfect for casual winter campers doing 5-10 nights per year. The HIKENTURE pad offers affordable winter capability if you’re willing to accept shorter lifespan and occasional quality issues.
7. REI Co-op Helix Insulated Air – Solid Mid-Range Option
While American-based REI doesn’t ship directly to Canada, the Helix Insulated appears occasionally on Amazon.ca through third-party sellers for $130-$170 CAD. It’s worth watching for if you want something between budget and premium.
Key Specifications:
- R-Value: 4.5 (ASTM F3340-18)
- Weight: 590g (21 oz)
- Thickness: 7.6 cm (3 inches)
- Warranty: REI’s legendary 1-year satisfaction guarantee
The quilted pattern provides good support for back sleepers, and the flat valve design makes inflation easier in cold conditions. The R-4.5 rating places it right at the edge of winter capability – fine for -5°C to -10°C with a good sleeping bag.
Canadian Availability Note: Since REI doesn’t have Canadian stores, warranty claims require shipping to the U.S., which dampens the appeal. However, the pad itself performs well for shoulder-season camping across Canadian provinces.
✅ Pros:
- Reliable REI quality standards
- Good value when on sale
- Quieter fabric than many budget options
❌ Cons:
- Sporadic Canadian availability
- Warranty complications from Canada
- Heavier than ultralight options
Verdict: If you find the REI Helix at a good price on Amazon.ca and don’t mind warranty complications, it’s a solid performer. Otherwise, stick with more readily available options like the Klymit pads.
Understanding R-Values: The Winter Camping Essential
What Is R-Value and Why It Matters
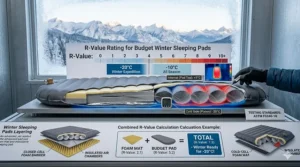
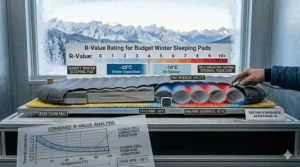
R-value measures thermal resistance – how well your sleeping pad prevents heat from escaping to the cold ground. Thanks to the ASTM F3340-18 standard implemented in 2020, we can now reliably compare pads across different brands.
Here’s how the testing works: A sleeping pad is sandwiched between a hot plate (simulating your body at 35°C) and a cold plate (simulating frozen ground). Over four hours, testers measure how much energy the hot plate needs to maintain temperature. Higher energy use means more heat loss, resulting in a lower R-value.
R-Value Recommendations for Canadian Winters
According to Therm-a-Rest’s research and Canadian winter camping experts:
- R-1 to R-2: Summer camping only (above 10°C)
- R-2 to R-3: Spring/fall shoulder seasons (0°C to 10°C)
- R-3 to R-4: Cool weather camping (-5°C to 5°C)
- R-4 to R-6: Winter camping (-15°C to -5°C) ⭐ Sweet spot for most Canadian winter camping
- R-6+: Extreme cold, deep winter, or snow camping (below -15°C)
Pro Tip from Canadian Winter Campers: Most sleeping bags are rated assuming you’re using a pad with R-5 or higher. If you’re sleeping cold in temperatures where your bag should keep you warm, your pad’s R-value is likely the culprit, not the bag.
The Power of Stacking: Adding R-Values
R-values are additive when you stack pads. This is the secret weapon of budget-conscious Canadian winter campers. For example:
- Klymit Insulated Static V (R-4.4) + NEMO Switchback (R-2.0) = R-6.4 total
- HIKENTURE 6.2 (R-6.2) + Z Lite Sol (R-2.0) = R-8.2 total
This approach gives you flexibility: use just the inflatable for three-season camping, add the foam pad for winter. The foam pad also serves as puncture protection and emergency backup if your inflatable fails.
Closed-Cell Foam vs. Inflatable: Choosing the Right Type
Closed-Cell Foam Pads
How They Work: Closed-cell foam pads like the NEMO Switchback and Therm-a-Rest Z Lite Sol use millions of tiny air bubbles trapped in foam. Each bubble acts as an insulator, preventing heat transfer.
Advantages for Canadian Winter Camping:
- Indestructible: Never punctures or leaks
- Zero maintenance: No inflation, no repairs
- Works when wet: Crucial for wet snow conditions
- Instant setup: Just unfold and go
- Doubles as seating: Use during breaks without worry
- Lightweight: 400-450g for full-length pads
Disadvantages:
- Bulky: Won’t compress small
- Less comfortable: Thin and firm
- Lower R-values alone: Typically R-2.0 maximum
- Challenges for side sleepers: Need inflatable for hip cushioning
Best Canadian Use Cases:
- Layering beneath inflatable pads for winter
- Ultralight summer backpacking
- Emergency backup for winter camping
- Sitting pad for snow camping
- Budget entry into winter camping
Inflatable Insulated Pads
How They Work: Modern insulated inflatables like the Klymit Static V use synthetic insulation or reflective films between air chambers. The insulation prevents convective heat loss while air provides cushioning.
Advantages for Canadian Winter:
- High R-values: Can reach R-7+ in compact size
- Comfortable: 5-10 cm thick cushions pressure points
- Compact: Pack to water bottle size
- Side-sleeper friendly: Enough loft for hip support
- Warm-to-weight ratio: Best warmth per gram
Disadvantages:
- Puncture risk: Sharp twigs, rocks, or animal claws can cause leaks
- Inflation required: Challenging in extreme cold
- Moisture concerns: Breath moisture can freeze inside in sub-zero temps
- Repair needed: Carries repair kit, know-how required
- Cost: Generally more expensive than foam
Best Canadian Use Cases:
- Primary winter camping pad (R-4+)
- Backpacking where weight matters
- Car camping comfort
- Situations requiring good sleep for next-day performance
The Hybrid Approach: What Most Canadians Do
Experienced Canadian winter campers use both types together:
- Primary System: Inflatable pad (R-4 to R-6) for comfort and warmth
- Foundation Layer: Cheap foam pad (R-2) underneath for:
- Added insulation (remember, R-values add!)
- Puncture protection from rough ground
- Emergency backup if inflatable fails
- Prevents inflatable from sliding on tent floor
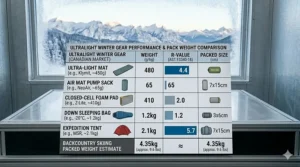
Example Setup for -20°C Alberta Winter:
- TREKOLOGY UL R7 (R-7.2) on top
- Z Lite Sol (R-2.0) cut to torso length underneath
- Total System: R-9.2 + puncture protection + 200g weight savings from shortened foam pad
This approach has saved countless Canadian campers from cold nights when inflatables developed slow leaks.
DIY Budget Hacks: Getting More Warmth for Less
1. The Foam Pad Stacking Technique
Instead of buying an expensive R-7 pad, stack two budget options:
Budget Winter System ($100 CAD total):
- HIKENTURE R-6.2 ($75) as primary pad
- Discount foam pad ($25) as base layer
- Combined R-Value: 8.2+ for deep winter capability
- Savings: $200+ compared to premium single pad
This is how I camped comfortably in -25°C conditions in Algonquin. The foam layer prevented the inflatable from touching the frozen tent floor, which would create cold spots through thermal bridging.
2. DIY Insulated Ground Sheet
Before even getting to your sleeping pad, create an insulated base:
Materials Needed:
- Reflectix bubble insulation (Canadian Tire, $15 for 1.5m)
- Tyvek or painter’s plastic ($10)
- Duct tape ($5)
Assembly:
- Cut Reflectix to your tent floor size
- Wrap with Tyvek for puncture protection
- Tape edges securely
Result: An extra R-2 to R-3 beneath your entire sleeping system. Manitoba winter campers swear by this technique for snow camping.
3. Torso-Length Modification
Buy a full-length foam pad, cut it to torso length (roughly 120 cm), save 200-250g.
Why This Works:
- Your torso generates the most heat loss
- Legs can use a backpack or extra clothing underneath
- Cuts cost in half if buying multiple pads
- Saved foam becomes sitting pads or dog pads
Canadian Winter Consideration: In temperatures below -20°C, keep full-length pads. The weight savings isn’t worth cold feet.
4. Strategic Sleeping Bag Integration
Your sleeping bag and pad work as a system. Budget optimization strategies:
- For down bags: Prioritize higher R-value pads since down compresses beneath you
- For synthetic bags: Can sometimes get away with slightly lower R-values
- Add a sleeping bag liner: Adds 5-7°C warmth for $30-$50 CAD
- Wear base layers: Dry merino wool adds insulation without pad expense
5. The Vapor Barrier Strategy
Advanced technique from Yukon winter campers:
Place a vapor barrier (thick garbage bag or commercial VBL) between you and your sleeping bag. This prevents sweat from freezing in your insulation during multi-day trips. While not directly related to pads, it lets you get away with slightly lower R-values by keeping your sleep system dry and efficient.
Warning: Only for experienced winter campers. Vapor barriers feel clammy and require proper ventilation to avoid condensation buildup.
Buyer’s Guide: How to Choose Your Budget Winter Sleeping Pad
Step 1: Determine Your Actual R-Value Need
Don’t over-buy! Match your pad to realistic use:
Casual Winter Camper (5-10 nights/year, -5°C to -10°C):
- Target: R-4 to R-5
- Best Options: Klymit Insulated Static V, REI Helix
- Budget: $120-$150 CAD
Serious Winter Camper (20+ nights/year, -15°C to -20°C):
- Target: R-6 to R-7
- Best Options: TREKOLOGY UL R7, HIKENTURE 6.2 + foam pad
- Budget: $150-$200 CAD for two-pad system
Extreme Conditions (below -20°C, Arctic camping):
- Target: R-8+
- Best Strategy: Stack pads (inflatable R-6 + foam R-2 + ground insulation)
- Budget: $180-$250 CAD
Ontario/Quebec Winter Weekend Warrior:
- Target: R-4 to R-5 (temperatures rarely below -15°C in provincial parks)
- Sweet Spot: Klymit Static V + Z Lite Sol for total R-6.4
- Budget: $180 CAD
Step 2: Consider Your Sleeping Style
Back Sleepers:
- Can use firmer pads
- Don’t need maximum thickness
- Good options: Any of the reviewed pads work
Side Sleepers:
- Need at least 6 cm thickness
- Require softer top layers
- Avoid: Foam-only setups
- Best: Klymit Static V Luxe, TREKOLOGY UL R7
Stomach Sleepers:
- Similar to back sleepers
- Can tolerate firmer surfaces
- Weight distribution more even
Combination Sleepers (moves a lot):
- Get wider pads (at least 64 cm)
- Consider Static V Luxe for 76 cm width
- Side rails helpful for staying centered
Step 3: Weight vs. Warmth Trade-offs
For Backpackers (every gram counts):
- Maximum: 700g for inflatable
- Pair with cut-down foam pad (200g)
- Best: HIKENTURE 6.2 (600g) or TREKOLOGY UL R7 (680g)
For Car Campers (comfort priority):
- Weight doesn’t matter
- Go for comfort and warmth
- Best: Static V Luxe (770g) + full-length Switchback (415g)
For Winter Backpackers (balancing both):
- Sweet spot: 500-650g for high R-value inflatable
- Add 200g for torso-length foam
- Total system: 700-850g with R-6+ capability
Step 4: Evaluate Long-Term Cost
Don’t just look at sticker price:
Scenario 1: Ultra-Budget Approach
- HIKENTURE 6.2 ($75) + Z Lite Sol ($60) = $135
- Expected life: 2-3 years moderate use
- Lifetime cost: $45-$67/year
Scenario 2: Quality Budget Approach
- Klymit Insulated Static V ($135) + NEMO Switchback ($80) = $215
- Expected life: 4-6 years moderate use
- Lifetime cost: $36-$54/year
The Math: The quality option actually costs less per year and provides better sleep quality. Sometimes the “expensive” budget option is the real deal.
Step 5: Canadian-Specific Considerations
Provincial Regulations:
- Some parks (like Algonquin) require self-sufficiency in winter
- Verify your gear is adequate before backcountry permits issued
- Ontario Parks winter camping requirements
Shipping and Warranty:
- Buy from Amazon.ca for easy returns
- Check if warranty service available in Canada
- Avoid U.S.-only brands unless willing to pay cross-border return shipping
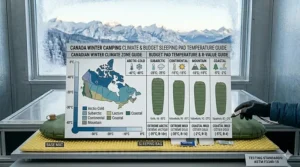
Climate Zones:
- Coastal BC: Wetter conditions, prioritize water-resistant materials
- Prairies/Ontario: Dry cold, standard pads work well
- Northern Canada: Extreme cold, need R-7+ minimum
- Maritime provinces: Variable conditions, versatile R-5 pad ideal
Seasonal Timing:
- Buy in March-April when winter stock gets cleared (20-30% off)
- Black Friday/Boxing Day sales (November/December)
- Amazon Prime Day (July) occasionally has camping deals
Canadian Winter Camping Safety: Your Sleeping Pad’s Role
Hypothermia Prevention Through Proper Insulation
According to Parks Canada’s winter safety guidelines, hypothermia is the single greatest risk in Canadian winter camping. Your sleeping pad is your primary defense against ground-induced hypothermia.
How Heat Loss Happens: When you lie on frozen ground without adequate insulation, your body loses heat through conduction at 160 times the rate of heat loss to air. Even with a -20°C sleeping bag, insufficient R-value means:
- Your body heat conducts into the pad
- The pad conducts into the frozen ground
- You lose core temperature faster than your body can generate heat
- Hypothermia sets in, often while you’re sleeping
The Danger Signs (from BC Parks winter safety guidelines):
- Shivering (early stage)
- Confusion, slurred speech
- Drowsiness, low energy
- In severe cases: loss of consciousness
Prevention Through Proper Pad Selection:
- Never skimp on R-value for expected conditions
- Test your sleep system at home in cold conditions first
- Always bring backup insulation (foam pad)
- Check your pad for leaks before every trip
Emergency Protocols for Sleeping Pad Failure
If Your Inflatable Pad Develops a Leak in Winter:
- Don’t Panic: You have time if you act quickly
- Deploy Foam Backup: This is why you brought it
- Add Insulation: Pile extra clothing, rope, backpack beneath you
- Create Ground Insulation: Evergreen boughs, dry leaves, your tarp
- Stay Awake: Don’t sleep until you’ve verified adequate insulation
- Move if Necessary: Sometimes breaking camp in dark is safer than risking hypothermia
Real Example: Last February, my Klymit Static V developed a slow leak at -18°C near Temagami. Having the Z Lite Sol underneath gave me enough insulation to safely finish the night, then repair the inflatable in daylight. Without that foam pad, I would have faced a dangerous situation.
Testing Your System Before Winter
The Backyard Test (Recommended by Ontario Parks):
- Set up your tent at home
- Check weather forecast for coldest night coming
- Sleep outside with your actual winter camping gear
- Note any cold spots or discomfort
- Adjust system before committing to backcountry
What to Test:
- Is your sleeping bag + pad warm enough together?
- Do you wake up cold at 3 AM (coldest hour)?
- Are you comfortable or just surviving?
- Does your pad stay inflated all night?
- Can you actually set up/pack down with gloves on?
This simple test has saved countless Canadian winter campers from expensive, dangerous mistakes in the backcountry.
Maintenance Tips for Maximizing Pad Lifespan
Storing Your Sleeping Pad
Inflatable Pads:
- Store partially inflated with valve open
- Never roll tight for storage (degrades materials)
- Keep in cool, dry place (not compressed in stuff sack)
- Avoid temperature extremes (not in garage/attic)
Foam Pads:
- Store flat or loosely rolled
- Keep away from petroleum products (degrades foam)
- Avoid prolonged UV exposure
- Clean with mild soap before storage
Canadian Winter Consideration: After winter camping, thoroughly dry your inflatable pad before storage. Moisture inside can freeze/thaw repeatedly, damaging internal baffles.
Field Care During Winter Trips
Preventing Punctures:
- Always use foam pad or ground cloth beneath inflatable
- Clear campsite of sharp objects before setup
- Keep pad away from crampon and ice axe contact
- Use care with wood stoves (flying sparks)
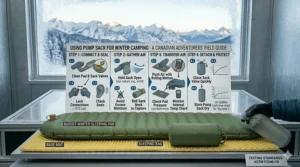
Cold Weather Inflation:
- Use pump sack instead of breath (prevents moisture freezing inside)
- Warm the pad in your tent before inflating (easier)
- Don’t over-inflate in cold (air expands when warmed)
Daily Inspection:
- Check for small leaks every morning
- Test valve seals for tightness
- Look for abrasion wear spots
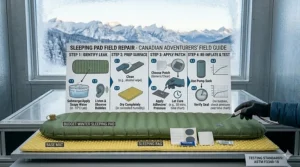
Repair Kit Essentials for Canadian Winter
Always Carry:
- Self-adhesive patch kit (warm between hands before applying in cold)
- Alcohol wipes (clean surface for patches)
- Mini scissors
- Extra valve cores if your pad uses them
- Duct tape (emergency repairs)
Winter-Specific Addition:
- Hand warmers (warm patches for better adhesion at -15°C)
- Small piece of Tenacious Tape (works in extreme cold better than standard patches)
Field Repair Technique for Cold Weather:
- Locate leak (listen/feel for escaping air)
- Clean area with alcohol wipe
- Warm patch between hands or with hand warmer
- Apply patch and hold firmly for 60 seconds
- Let cure for 10 minutes before re-inflating
- Check repair held before sleeping on it
I’ve successfully repaired a Static V at -22°C using this method. The key is warming the patch before application.
Environmental Considerations: Eco-Friendly Budget Options
Sustainable Materials in Budget Pads
NEMO Switchback:
- Uses 100% recycled polyethylene foam
- Bluesign-approved materials
- PFC-free fabric treatments
Therm-a-Rest Z Lite Sol:
- Solution-dyed fabric (90% less water/energy than traditional dyeing)
- U.S. manufacturing (lower carbon footprint for North American buyers)
- Long lifespan reduces waste
Klymit Products:
- Some models use recycled materials (check specific listings)
- Generally have good longevity for price point
Leave No Trace Winter Camping in Canada
Sleeping Pad Implications:
- Don’t create large flat areas by stomping snow (foam pads can go on uneven ground)
- Use existing compacted snow for tent platforms when possible
- Properly dispose of damaged pads (don’t leave in backcountry)
From Parks Canada’s winter guidelines:
- Minimize impact even in snow (spring melt reveals all)
- Use designated winter campsites when available
- Pack out all waste including broken pad pieces
Extending Lifespan = Environmental Win
The Math:
- One well-maintained pad for 5 years beats buying 2-3 cheap pads
- Reduces manufacturing energy and raw materials
- Keeps products out of landfills longer
Budget-Friendly Sustainability:
- Buy quality used gear (check MEC Gear Swap, Facebook Marketplace)
- Repair instead of replace when possible
- Donate old but functional pads to outdoor education programs
- Consider pad rental for occasional winter camping
FAQ: Budget Winter Sleeping Pads in Canada
❓ What R-value do I need for winter camping in Canada?
❓ Can I use a summer sleeping pad for winter camping in Canada?
❓ How much should I expect to spend on a budget winter sleeping pad in Canada?
❓ Should I buy closed-cell foam or inflatable for Canadian winter camping?
❓ Where can I buy budget winter sleeping pads in Canada?
Conclusion
Winter camping in Canada doesn’t require premium gear to be safe and comfortable. As we’ve explored, budget winter sleeping pads like the Klymit Insulated Static V ($118-$144 CAD) and TREKOLOGY UL R7 ($80 CAD) deliver genuine winter performance without breaking the bank. The secret is understanding R-values, choosing the right pad for your actual needs, and often using a two-pad system for maximum warmth and safety.
From my years of winter camping across Ontario, Quebec, and the Rockies, I’ve learned that expensive gear doesn’t automatically mean better performance. A thoughtful combination of a budget inflatable (R-4 to R-6) paired with an affordable foam pad (R-2) gives you the warmth of premium pads costing $300+ CAD, while adding puncture protection and emergency backup.
Your Next Steps:
- Assess your needs: Realistically, how cold will you camp?
- Calculate required R-value: Use the guidelines in this article
- Choose your approach: Single high-R pad or two-pad system?
- Test before committing: Do the backyard test in cold weather
- Always carry backup: Foam pads save lives when inflatables fail
Remember that according to Parks Canada’s winter safety protocols, proper insulation from the frozen ground is non-negotiable for safe winter camping. Your sleeping pad is not optional equipment – it’s life-safety gear.
Whether you’re planning a weekend trip to Algonquin’s frozen lakes, a week-long winter adventure in Banff, or just want to extend your camping season into shoulder seasons, the budget options reviewed here will keep you warm and safe. Winter camping opens up a magical side of Canada’s wilderness – quiet, pristine, and dramatically beautiful. Don’t let gear costs stop you from experiencing it.
Stay warm out there, and remember: test your system, know your limits, and always tell someone your plans. Happy winter camping! 🍁❄️
Recommended for You
- Nemo Tensor Extreme vs XTherm: 7 Best Winter Pads Canada 2026
- 7 Best Insulated Sleeping Pad Winter Picks Canada 2026 Guide
- 7 Best Women’s Winter Sleeping Bags Canada 2026 (Expert Tested)
Disclaimer: This article contains affiliate links to Amazon.ca. If you purchase products through these links, we may earn a small commission at no additional cost to you.
✨ Found this helpful? Share it with your friends! 💬🤗