In This Article
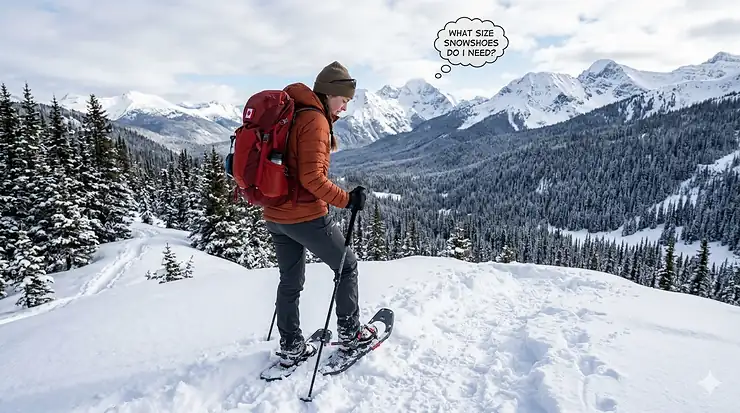
Choosing what size snowshoes do I need might seem straightforward, but getting it wrong can transform your winter adventure into an exhausting struggle through deep snow. I’ve watched countless beginners stumble onto the trails with oversized snowshoes that made them waddle like penguins, or undersized ones that left them sinking knee-deep with every step. The difference between gliding across powder and fighting for every metre comes down to understanding a simple equation: your total weight plus the snow conditions equals your ideal snowshoe size.
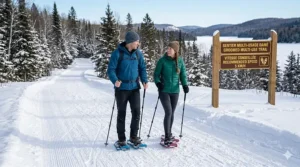
Canadian winters demand respect, and your snowshoe selection is where that respect begins. From the champagne powder of the Rockies to the wet, heavy snow of Ontario’s boreal forests, our diverse conditions require specific equipment choices. Whether you’re planning a casual stroll through Gatineau Park or tackling backcountry routes in Banff National Park, getting your snowshoe size right isn’t just about comfort—it’s about safety and enjoying every moment of Canada’s breathtaking winter landscape without unnecessary fatigue.
Quick Comparison Table
| Snowshoe Size | Total Weight Capacity | Best Snow Conditions | Terrain Type | Typical User |
|---|---|---|---|---|
| 21-22 inches | Up to 125-150 lbs (57-68 kg) | Packed trails | Flat to rolling | Youth, smaller adults |
| 25 inches | 150-175 lbs (68-79 kg) | Mixed conditions | Rolling terrain | Average women |
| 30 inches | 175-220 lbs (79-100 kg) | Powder & packed | All terrain | Average men |
| 36 inches | 220+ lbs (100+ kg) | Deep powder | Backcountry | Heavy loads |
💬 Just one click – help others make better buying decisions too! 😊
Top 7 Snowshoes for Canadians: Expert Analysis
1. MSR Evo Trail Snowshoes
The MSR Evo Trail represents exceptional value for Canadian snowshoers seeking reliable performance without breaking the bank. This unisex model features MSR’s innovative UniBody construction—a single-piece plastic deck that eliminates the traditional aluminum frame while maintaining impressive durability. The integrated steel traction rails and aggressive toe crampons provide confident grip on icy Canadian trails.
Key Specifications:
- Available in 22″ and 25″ lengths
- Weight capacity: 120-180 lbs (22″), 150-210 lbs (25″)
- Weight per pair: 1.6 kg (22″), 1.8 kg (25″)
Canadian Pricing: $183.96-$229.95 CAD at MEC and Amazon.ca
Canadian buyers consistently praise the Evo Trail’s freeze-proof rubber bindings and glove-friendly straps—essential features for our harsh winters. One Toronto reviewer noted they handled the Bruce Trail’s variable conditions beautifully, from hard-packed snow to fresh powder.
✅ Pros: Lightweight, affordable, excellent traction, easy bindings
✅ Pros: Durable UniBody construction eliminates frame failures
✅ Pros: Compatible with wide range of boot sizes
❌ Cons: No heel lifts for steep climbs
❌ Cons: Plastic decking can be noisy on hard snow
2. MSR Lightning Trail Snowshoes
The MSR Lightning Trail elevates performance with features serious Canadian snowshoers demand. These premium snowshoes incorporate MSR’s innovative 360° Traction frames with perimeter teeth that provide lateral stability when traversing slopes—crucial for mountainous terrain in BC and Alberta. The new Paragon bindings offer tool-free adjustment and exceptional comfort during long days.
Key Specifications:
- Available in 22″, 25″ women’s-specific models
- UniBody deck with integrated traction
- Televator heel lifts for climbing
Canadian Pricing: $269.96-$359.95 CAD (regular price)
Alberta backcountry enthusiasts report these snowshoes excel in the Rockies’ variable conditions. The heel lifts make a noticeable difference on extended climbs, reducing calf fatigue significantly. Several Vancouver reviewers appreciate how quietly they perform compared to competitors.
✅ Pros: Excellent traction on steep, icy terrain
✅ Pros: Heel lifts reduce fatigue on climbs
✅ Pros: Comfortable Paragon bindings
❌ Cons: Higher price point
❌ Cons: May be overkill for flat terrain
3. Tubbs Flex STP Snowshoes
The Tubbs Flex STP offers impressive performance at a budget-friendly price point, making it perfect for Canadians testing the waters of snowshoeing. The flexible composite deck absorbs shock and operates more quietly than rigid plastic alternatives—a welcome feature for peaceful winter hikes through Quebec’s forests. The ActiveLift heel bars provide climbing assistance when needed.
Key Specifications:
- Available in 22″ women’s, 24″ and 28″ men’s
- Flexible composite construction
- Rotating Toe Cord pivot system
Canadian Pricing: Approximately $140-$180 CAD on Amazon.ca
Canadian reviewers from Ontario appreciate the natural stride these snowshoes provide. The flexible tail design encourages proper walking technique, particularly beneficial for beginners still developing their snowshoeing gait. Manitoba users report excellent durability through multiple seasons.
✅ Pros: Affordable entry-level option
✅ Pros: Quiet, flexible composite deck
✅ Pros: ActiveLift heel bars included
❌ Cons: Less aggressive traction than premium models
❌ Cons: Lower weight capacity than aluminum frames
4. Atlas Range Trail Snowshoes
The Atlas Range Trail combines recreational comfort with light backcountry capability, ideal for Canadian snowshoers who want versatility. Atlas’s Spring-Loaded Suspension system absorbs trail shock while the Wrapp Trail binding provides exceptional comfort with minimal pressure points—crucial for all-day adventures. The aluminum V-frame design offers superior flotation in various snow conditions.
Key Specifications:
- Available in multiple sizes (22″-30″)
- Spring-Loaded Suspension system
- All-Trac toe crampons
Canadian Pricing: $161.99-$269.99 CAD (often on sale)
Saskatchewan users highlight how these snowshoes handle the prairies’ wind-packed snow exceptionally well. The binding system accommodates everything from winter hiking boots to bulky pac boots—important flexibility for Canada’s extreme temperature variations. Quebec backcountry skiers appreciate using them for ski touring access.
✅ Pros: Comfortable suspension system
✅ Pros: Versatile for multiple snow types
✅ Pros: Accommodates various boot sizes
❌ Cons: Slightly heavier than composite models
❌ Cons: V-frame less maneuverable in tight trails
5. Retrospec Drifter Snowshoes
The Retrospec Drifter delivers solid performance at an entry-level price, making winter recreation accessible to more Canadians. These aluminum-framed snowshoes feature a double-ratchet binding system that’s genuinely glove-friendly—tested personally at -20°C and still functional. The 6061-T6 aluminum frame provides excellent strength-to-weight ratio.
Key Specifications:
- Available in 21″, 25″, 30″ sizes
- Lightweight aluminum frame
- Includes carrying bag
Canadian Pricing: $110-$150 CAD on Amazon.ca
Nova Scotia users praise these for coastal trail conditions where wet, heavy snow predominates. The polyethylene decking resists moisture absorption, preventing weight gain during long outings. Several Calgary reviewers mention the included carrying bag as a thoughtful addition for transit.
✅ Pros: Excellent value for beginners
✅ Pros: True glove-friendly bindings
✅ Pros: Includes storage bag
❌ Cons: Basic traction compared to premium models
❌ Cons: No heel lifts
6. G2 Lightweight Snowshoes
The G2 Snowshoes represent the budget end of the market but deliver surprising performance for casual Canadian snowshoers. Available on Amazon.ca with quick shipping across Canada, these aluminum-framed snowshoes come complete with trekking poles and carrying bag—everything you need to start. The EVA-padded ratchet binding provides decent comfort.
Key Specifications:
- Available in 21″, 25″, 30″, 36″ sizes
- Complete kit with poles and bag
- Heel lift bars included
Canadian Pricing: $80-$130 CAD (complete kit)
Ontario recreational users report these work well for groomed trails and light backcountry use. The included trekking poles, while basic, provide adequate stability for beginners. Several reviewers note the 36″ option handles deep powder better than expected for the price point.
✅ Pros: Complete kit at low price
✅ Pros: Wide size range including 36
✅ Pros: Good for occasional use
❌ Cons: Build quality below premium brands
❌ Cons: Bindings less durable long-term
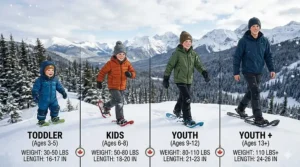
7. MSR Tyker Kids Snowshoes
The MSR Tyker gives Canadian kids proper snowshoeing equipment rather than toys. These scaled-down versions feature the same quality construction as adult MSR snowshoes, with simplified bindings young hands can operate independently. The UniBody deck withstands the unique abuse kids inflict on gear.
Key Specifications:
- 17″ length
- Weight capacity: Up to 90 lbs (41 kg)
- Fits kids’ sizes 7.5Y-4.5US
Canadian Pricing: $87.96-$109.95 CAD
Canadian parents report these introduce children aged 3-9 to snowshoeing successfully. The simplified bindings work with regular winter boots, eliminating the need for specialized footwear. Manitoba families appreciate how these handle both packed trails and backyard adventures equally well.
✅ Pros: Quality construction for kids
✅ Pros: Simple, kid-friendly bindings
✅ Pros: Durable enough for multiple children
❌ Cons: Kids quickly outgrow them
❌ Cons: Limited size range
Understanding What Size Snowshoes Do I Need
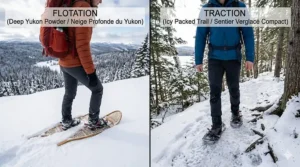
The fundamental principle behind snowshoe sizing is flotation—your snowshoe’s ability to keep you on top of the snow rather than sinking with each step. According to Parks Canada, proper sizing ensures both safety and enjoyment during winter recreation. What size snowshoes do I need depends primarily on your total loaded weight, which includes your body weight plus all gear, clothing, and any backpack you’ll carry.
Think of snowshoes like tires on a vehicle. Larger surface area distributes weight more effectively, just as wider tires prevent sinking into sand or mud. When you’re calculating what size snowshoes do I need, you’re essentially determining how much surface area is required to support your total weight across varying snow conditions. Canadian snow ranges dramatically—from the maritime regions’ wet, dense snow to the prairies’ light, fluffy powder—and each demands different flotation considerations.
The Total Weight Calculation Formula
Determining what size snowshoes do I need begins with honest assessment of your total weight. Stand on a scale wearing your typical winter hiking outfit—insulated jacket, snow pants, winter boots, hat, and gloves. This clothing weight typically adds 4.5-6.8 kg (10-15 lbs) beyond your regular body weight. Next, weigh your packed day pack with water, snacks, first aid kit, extra layers, and emergency gear, which usually totals 4.5-11.3 kg (10-25 lbs) for day trips.
Add these three numbers together: body weight + clothing weight + pack weight = total loaded weight. This total is what your snowshoes must support. For example, if you weigh 75 kg (165 lbs), your winter clothing adds 5.4 kg (12 lbs), and your day pack weighs 6.8 kg (15 lbs), your total is 87.2 kg (192 lbs). This calculation directly determines what size snowshoes do I need for adequate flotation.
How to Choose Snowshoes for Beginners
Choosing your first pair of snowshoes can feel overwhelming, but focusing on a few key factors simplifies the decision significantly. For beginners, recreational snowshoes designed for flat to rolling terrain provide the best introduction to the sport. These models typically feature simplified binding systems, moderate traction, and affordable price points—perfect for learning whether snowshoeing becomes your winter passion.
Start by evaluating where you’ll snowshoe most frequently. Will you stick to groomed trails in provincial parks, or do you envision venturing into unmarked backcountry? Groomed trails allow smaller snowshoes since the packed surface provides support, while off-trail powder demands larger sizes for adequate flotation. According to Health Canada’s winter sports safety guidelines, matching equipment to your intended use significantly reduces injury risk.
Essential Features for First-Time Buyers
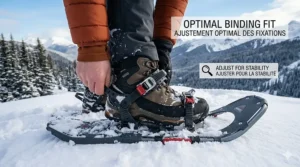
Look for snowshoes with simple, glove-friendly bindings you can operate wearing thick winter gloves. Ratchet-style bindings or boa systems work well, while complicated buckles become frustrating in -20°C temperatures. The binding should accommodate your winter boots comfortably—bring your boots when shopping or measure them if buying online. Most recreational snowshoes fit boot sizes from men’s 6 to men’s 13, but verify before purchasing.
Traction matters even on groomed trails, especially in Canada where melt-freeze cycles create icy conditions. Beginners should seek snowshoes with at least toe crampons (teeth under the binding area) and heel cleats or braking bars. These features provide confidence on modest hills and mixed conditions without the aggressive traction mountaineering snowshoes offer.
Renting Before Buying
Many Canadian outdoor shops near popular winter destinations offer snowshoe rentals, as do several Parks Canada locations including Gatineau Park. Renting allows you to test different sizes and styles before committing to a purchase. Spend a full day wearing rental snowshoes on varied terrain—flat sections, gentle hills, packed trails, and unpacked snow—to understand what works for your stride and intended use.
Pay attention to how the snowshoes feel after several kilometres. Do the bindings create pressure points? Does your stride feel natural or forced? Can you walk backwards easily when needed? These practical insights prove invaluable when selecting your own pair. Rental experiences also clarify whether features like heel lifts or aggressive crampons matter for your typical snowshoeing adventures.
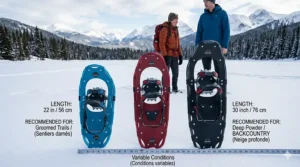
Snowshoe Sizing Chart: Complete Guide
Standard Sizing by Weight and Length
| Your Total Weight | Flat/Packed Trails | Rolling Terrain | Deep Powder/Backcountry |
|---|---|---|---|
| Up to 54 kg (120 lbs) | 20-21″ | 21-22″ | 22-25″ |
| 54-68 kg (120-150 lbs) | 21-22″ | 22-25″ | 25-27″ |
| 68-79 kg (150-175 lbs) | 22-25″ | 25-27″ | 27-30″ |
| 79-91 kg (175-200 lbs) | 25-27″ | 27-30″ | 30-33″ |
| 91-100 kg (200-220 lbs) | 27-30″ | 30-33″ | 33-36″ |
| 100+ kg (220+ lbs) | 30-33″ | 33-36″ | 36″+ with tails |
This comprehensive sizing chart reflects Canadian snow conditions and typical gear loads. Remember that these are guidelines—snow conditions significantly influence optimal sizing. The chart accounts for our diverse terrain from flat prairie trails to mountainous backcountry routes.
Women’s-Specific Sizing Considerations
Women’s snowshoes aren’t just smaller versions of men’s models—they’re designed with narrower frames to accommodate women’s typically narrower gait. This design prevents the awkward bow-legged walking that oversized snowshoes force. Women’s models also feature smaller volume bindings to fit women’s typically smaller boots securely.
However, women who carry heavy packs, weigh more than 79 kg (175 lbs), or frequently break trail in deep powder often benefit from men’s or unisex models despite the wider frame. The additional surface area provides necessary flotation that outweighs gait considerations. Test both options if you’re on the boundary between sizes.
Aluminum vs Composite Snowshoes: Making the Right Choice
The frame material debate—aluminum versus composite—significantly impacts performance, durability, and price. Understanding these differences helps Canadian snowshoers select equipment matching their needs and budget. Both materials perform well in our climate, but each offers distinct advantages depending on your snowshoeing style.
Aluminum Frame Snowshoes
Aluminum-framed snowshoes feature a tubular aluminum perimeter frame with decking material (plastic, nylon, or rubber) attached inside. These traditional designs, according to REI’s expert guidance, excel in deep, unconsolidated powder where maximum flotation matters most. The frame provides structural rigidity while keeping overall weight reasonable.
The aluminum frame allows for larger deck sizes without excessive weight penalties—important for taller, heavier users or those carrying substantial gear. Many aluminum models also accept optional tail extensions, adding 5-6 inches of flotation for particularly deep snow conditions. This versatility appeals to backcountry travelers who encounter variable conditions.
Canadian users appreciate aluminum frames’ quiet operation on soft snow and their flexibility in extremely cold temperatures. Unlike some composite materials, aluminum doesn’t become brittle at -30°C. The frame design also facilitates repairs—bent frames can often be straightened, and damaged decking replaced independently.
Composite Snowshoes
Composite snowshoes utilize rigid plastic or molded materials for both frame and decking in a single-piece construction. Wikipedia notes that modern composite designs emerged in the 1970s, revolutionizing snowshoe technology with their simplicity and durability. The unibody design eliminates potential frame failure points while reducing overall parts that could break.
These snowshoes excel on packed trails, crusty snow, and icy conditions where their integrated traction elements grip confidently. The solid construction allows manufacturers to mold aggressive side rails and traction features directly into the deck—providing superior edging when traversing slopes. This makes composite models popular for mountainous terrain in BC and Alberta.
The downside? Composite snowshoes create more noise on hard-packed snow—a distinct “slapping” sound with each step that some users find annoying. They’re also typically louder than aluminum frames on icy conditions. However, they require minimal maintenance, resist damage from impact with rocks or logs, and perform reliably across temperature extremes.
Which Material for Canadian Conditions?
For recreational snowshoers primarily using groomed trails at provincial parks, ski resorts, or developed winter hiking areas, composite snowshoes offer excellent value and performance. Their integrated traction handles mixed conditions confidently, and the lower maintenance requirements suit occasional users.
Serious backcountry enthusiasts venturing into deep powder, breaking trail regularly, or carrying heavy overnight gear benefit from aluminum frames’ superior flotation and versatility. The ability to add tails for extreme conditions provides valuable flexibility. Alpine ski tourers and ice climbers often prefer aluminum frames for accessing terrain.
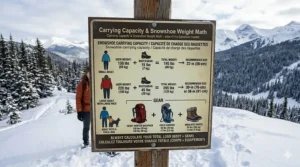
Total Weight Calculation for Snowshoes: Getting It Right
Accurate weight calculation determines whether your snowshoes provide adequate flotation or leave you exhausted from post-holing. Many beginners underestimate their total weight, choosing too-small snowshoes that perform poorly in real-world conditions. Taking time to measure accurately prevents expensive mistakes.
Step-by-Step Weight Calculation
Step 1: Weigh Your Base Body Weight Use a reliable scale wearing only underwear or light indoor clothing. Record this number in kilograms and pounds—manufacturers use both measurement systems. This forms your baseline before adding gear.
Step 2: Weigh Your Winter Clothing Package Gather everything you’d wear snowshoeing: base layers, insulating mid-layers, winter jacket, snow pants, gloves, hat, neck gaiter or balaclava. Weigh this entire outfit. Most complete winter clothing packages weigh 3.6-6.8 kg (8-15 lbs) depending on the severity of conditions you dress for.
Step 3: Weigh Your Winter Boots Winter boots add significant weight—often 1.8-3.6 kg (4-8 lbs) for a pair of insulated winter hiking boots or pac boots. Weigh them separately since you’re wearing them while snowshoeing.
Step 4: Weigh Your Pack and Contents Load your daypack exactly as you’d carry it snowshoeing: water (typically 2 litres = 2 kg), food, first aid kit, emergency shelter, extra clothing layers, navigation tools, avalanche safety gear if applicable. Typical day packs weigh 4.5-9 kg (10-20 lbs) fully loaded. Overnight packs for winter camping can reach 18-27 kg (40-60 lbs).
Step 5: Add Everything Together Total Weight = Body Weight + Winter Clothing + Winter Boots + Loaded Pack
For example:
- Body weight: 77 kg (170 lbs)
- Winter clothing: 5.4 kg (12 lbs)
- Winter boots: 2.7 kg (6 lbs)
- Loaded daypack: 6.8 kg (15 lbs)
- Total: 92 kg (203 lbs)
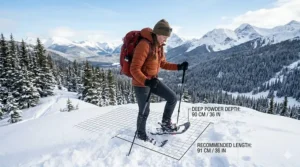
This total determines what size snowshoes you need. In this example, snowshoes rated for 91-100 kg (200-220 lbs) would be appropriate for mixed conditions.
Adjusting for Snow Conditions
Your calculated total weight represents your maximum load. However, snow conditions allow some flexibility. For groomed, hard-packed trails like those at Gatineau Park or Kananaskis Country, you can size down slightly—perhaps selecting snowshoes rated for your weight minus 9-13.6 kg (20-30 lbs). The firm surface provides inherent support.
Conversely, if you regularly break trail in deep, unconsolidated powder—common in BC’s Coast Mountains or after major prairie snowstorms—size up beyond your calculated weight. Add 9-13.6 kg (20-30 lbs) to your total when selecting snowshoes for primarily powder conditions. This extra surface area prevents exhausting post-holing.
Snowshoe Terrain Types: Matching Equipment to Conditions
Canadian terrain diversity demands understanding how different snowshoe designs handle various environments. From Saskatchewan’s endless flat expanses to the technical alpine routes in the Rockies, matching your snowshoes to typical terrain ensures optimal performance and enjoyment.
Flat Terrain Snowshoes
Flat terrain snowshoes suit groomed trails, urban paths, lakeshores, and prairie landscapes where elevation changes minimally. These snowshoes prioritize lightweight construction and manoeuvrability over aggressive traction features. Shorter lengths (21-25 inches) make them nimble and easy to control.
Flat terrain models typically feature basic toe crampons and smooth decking without aggressive cleats or side rails. They excel on well-traveled routes where previous traffic has packed the snow. Think of them as the running shoes of snowshoeing—designed for efficiency on established paths rather than technical challenges.
Canadian locations ideal for flat terrain snowshoes include Ottawa’s Rideau River trails, Winnipeg’s Birds Hill Provincial Park, and Saskatchewan’s Wanuskewin Heritage Park. These snowshoes also work beautifully for casual recreation in urban greenspaces and neighbourhood parks.
Rolling Terrain Snowshoes
Rolling terrain snowshoes handle gentle to moderate hills, variable snow conditions, and mixed trail types—the most common Canadian snowshoeing environment. These all-around models balance flotation, traction, and manoeuvrability, making them ideal first snowshoes for most users.
Look for models with toe crampons, heel cleats, and optional heel lifts (also called climbing bars). The heel lifts reduce calf fatigue when ascending moderate slopes by creating a platform under your heel, effectively reducing the angle your ankle must flex. Most mid-range snowshoes include these features.
Rolling terrain encompasses much of Ontario’s provincial parks, the Laurentian mountains in Quebec, Alberta’s foothills, and Nova Scotia’s Cape Breton Highlands. These environments mix flat sections with sustained climbs and descents, requiring versatile equipment.
Mountain Terrain Snowshoes
Mountain terrain demands aggressive traction, crampon systems, and typically larger sizes for off-trail travel. These technical snowshoes feature vertical front points (crampons) that bite into icy slopes, side rails for traversing, and mandatory heel lifts for sustained steep climbing.
Mountain snowshoes typically weigh more due to beefier construction and metal components, but this weight pays dividends in confidence on challenging terrain. They handle everything from firm wind-pressed snow to bottomless powder, from steep kick-turns to exposed traverses where a slip has serious consequences.
Canadian mountain snowshoeing centers around the Rockies—Banff, Jasper, Kananaskis—and BC’s Coast and Columbia mountains. According to Avalanche Canada, anyone venturing into mountain terrain must understand avalanche safety and carry appropriate rescue equipment.
Snowshoe Maintenance Tips: Extending Equipment Lifespan
Proper maintenance keeps your snowshoes performing reliably for many Canadian winters. While modern snowshoes require minimal upkeep compared to traditional wooden models, a few simple practices prevent premature wear and maintain optimal performance throughout their lifespan.
Post-Trip Cleaning and Drying
After each outing, especially in wet or salty conditions, rinse your snowshoes with cool fresh water. Road salt and chemical deicers used on parking areas and trailheads accelerate corrosion on metal components. Pay particular attention to bindings, crampons, and connecting hardware.
Shake off excess water and dry snowshoes in a room-temperature environment—avoid placing them directly beside heating sources, which can dry out materials too quickly and cause cracking. Hang them by their bindings or prop them vertically to allow complete air circulation. This prevents moisture from pooling in crevices where it could freeze and expand, damaging components.
Check bindings for ice accumulation after each use. Ice wedged in ratchet mechanisms or around buckles can prevent proper operation on your next outing. Remove any ice immediately while it’s still manageable rather than discovering frozen bindings at the trailhead.
Seasonal Inspections
At the start of each winter season, conduct a thorough inspection before your first trip. Check frame integrity for cracks, bends, or signs of stress. Aluminum frames develop fatigue cracks at stress points, particularly where side rails connect to the main frame. Composite frames may show stress cracks near crampon attachment points.
Examine decking material for tears, holes, or UV damage. Fabric decking degrades over time, especially if stored in direct sunlight. Small tears can be field-repaired with duct tape temporarily, but plan replacement if damage is extensive. Most manufacturers sell replacement decking separately from frames.
Inspect all binding components carefully. Check straps for fraying or cracking, especially where they fold repeatedly. Test ratchet mechanisms for smooth operation and verify buckles close securely. Replace worn straps before they fail during a trip—most manufacturers offer replacement parts readily.
Crampon Care
Keep crampons sharp for optimal traction. Dull crampons slip on hard snow and ice, reducing confidence and increasing fall risk. If your snowshoes see heavy use, particularly on rocky terrain or icy conditions, crampons may need sharpening annually. Some outdoor shops offer this service, or you can carefully file them using a metal file.
Check crampon attachment points regularly. Crampons secure through various methods—rivets, bolts, or molded integration. Loose crampons dramatically reduce traction and can detach entirely if not addressed. Tighten loose bolts and replace any damaged rivets promptly.
Storage Best Practices
Store snowshoes in a cool, dry location away from direct sunlight and temperature extremes. Basements, garages, or gear closets work well if they remain above freezing and below 25°C. UV radiation degrades decking materials and can fade colours over time.
Hang snowshoes rather than storing them stacked or leaning. This prevents frame warping and maintains proper shape. Simple hooks or pegboard systems work excellently for this purpose. Ensure bindings aren’t bearing weight during storage—unbuckle straps and allow them to rest in their natural position.
Snowshoe Storage Ideas: Keeping Equipment Ready
Efficient storage keeps your snowshoes accessible when fresh snow beckons while protecting them from damage during off-season months. Canadian homes vary from compact urban apartments to spacious rural properties, but smart storage solutions exist for every situation.
Indoor Storage Solutions
Wall-mounted systems provide the most space-efficient storage for snowshoes in homes with limited square footage. Simple J-hooks installed into wall studs work perfectly—hang snowshoes by their toe bindings with crampons facing the wall to prevent accidental snags. Space hooks 60-75 cm (24-30 inches) apart to accommodate snowshoe length.
Pegboard systems offer maximum versatility for organizing winter gear. Install pegboard panels in mudrooms, garages, or basements, then arrange hooks to accommodate snowshoes, poles, and other equipment. This solution adapts easily as your gear collection evolves, and clearly visible storage encourages regular use.
Freestanding storage racks work well for renters or those unable to install wall-mounted systems. Purpose-built snowshoe racks hold multiple pairs vertically in a compact footprint. Alternatively, ski racks typically accommodate snowshoes equally well—the vertical storage principle applies to both.
Garage and Basement Options
Overhead storage in garages maximizes often-wasted ceiling space. Install heavy-duty hooks or specialized overhead racks for seasonal equipment. This keeps snowshoes completely out of the way during summer while remaining accessible when snow returns. Ensure stored items clear garage door operation.
Utility shelving provides another practical option for garage or basement storage. Metal or plastic shelving units with 45-60 cm (18-24 inch) depth accommodate snowshoes laid flat. This method works particularly well for families with multiple pairs—dedicate one shelf per family member for all their winter gear.
Consider climate control if storing in unheated spaces. While snowshoes tolerate cold better than heat, extreme temperature swings and high humidity accelerate material degradation. Dehumidifiers in basements prevent moisture damage to bindings and decking materials.
Seasonal Transition Strategies
As winter transitions to spring, clean snowshoes thoroughly before long-term storage. This final cleaning removes any accumulated dirt, salt, or organic material that could attract pests or accelerate degradation. Ensure complete drying before storage—any residual moisture invites mould or mildew.
Store snowshoes with bindings slightly loosened to prevent memory compression in straps and buckles. However, don’t remove bindings entirely unless performing maintenance—keeping systems assembled ensures they’re ready when needed.
Create a pre-season checklist attached to your storage area. List items to inspect before first use: check bindings, verify crampon sharpness, inspect decking integrity. This reminder ensures you address any maintenance needs before discovering problems at the trailhead.
Vehicle Storage Considerations
Many Canadian snowshoers store their equipment in vehicles during active season for spontaneous outings. However, this requires special considerations given our climate extremes. Temperatures inside vehicles parked in winter sun can reach surprising highs—sufficient to damage some snowshoe materials.
If storing snowshoes in vehicles, keep them covered or in storage bags to block direct sunlight. Place them where they won’t shift during driving—the load area of SUVs or secured in truck beds work well. Never store snowshoes loose in passenger areas where they could become projectiles during sudden stops.
Remove snowshoes from vehicles during extended warm periods (above 15°C) to prevent UV and heat damage. The confined space of vehicles amplifies both factors, accelerating material degradation.
Advanced Sizing Considerations: Fine-Tuning Your Choice
Beyond basic weight calculations, several factors influence what size snowshoes you need for optimal performance. Understanding these nuances helps experienced snowshoers fine-tune equipment choices for specific adventures or evolving needs.
The Breaking Trail Factor
Breaking trail through untracked snow requires significantly more flotation than following established tracks. If you frequently pioneer routes—whether backcountry exploring or being first on the trail after fresh snowfall—size up 4-6 inches beyond standard recommendations for your weight. This additional surface area prevents the exhausting work of post-holing through deep snow.
Consider your typical group composition. If you usually snowshoe with others and rotate trail-breaking duties, standard sizing works well since you’ll only break trail occasionally. However, solo snowshoers or those consistently leading groups benefit from larger snowshoes that make trail-breaking more efficient.
Speed and Agility Requirements
Snowshoe running and fast-paced fitness snowshoeing demand different sizing than recreational rambling. Runners prioritize manoeuvrability and light weight over maximum flotation, often selecting snowshoes 2-4 inches shorter than weight-based recommendations suggest. This trade-off accepts slightly more sinking in exchange for more natural stride and quicker cadence.
The running snowshoe category specifically addresses these needs with narrower profiles, aggressive traction, and lightweight construction. If fitness and speed interest you more than distance covering or load carrying, investigate these specialized models rather than traditional recreational snowshoes.
Tail Extensions and Modular Systems
Some snowshoe models accept optional tail extensions—removable sections that add 5-6 inches of length for deep powder conditions. MSR offers this feature on several models, providing versatility for users encountering variable conditions. This modular approach lets you optimize flotation for specific outings rather than committing to one size.
Tails prove particularly valuable for Canadian snowshoers who experience dramatically different conditions depending on location and season. Early winter often brings lighter, fluffier snow requiring maximum flotation, while late winter’s consolidated snowpack allows smaller configurations.
Understanding Snowshoe Weight Ratings
Manufacturer weight ratings represent maximum loads snowshoes can support while maintaining reasonable flotation in typical conditions. However, these ratings require interpretation since “typical conditions” vary dramatically across Canada’s climate zones and through winter seasons.
Conservative vs Aggressive Ratings
Different manufacturers approach weight ratings with varying philosophy. Some provide conservative ratings ensuring excellent flotation under most circumstances, while others push limits with aggressive ratings assuming favourable conditions. Research how specific manufacturers rate their products—online reviews often reveal whether models perform at advertised capacities.
When comparing snowshoes, verify whether weight ratings represent just your body weight or total loaded weight including gear. Most quality manufacturers specify “fully loaded weight” or “total weight,” but budget brands sometimes reference body weight alone—creating misleading comparisons.
Environmental Modifiers
Temperature significantly affects snow characteristics and required flotation. Cold, dry snow typical of prairie winters and interior mountains is light and fluffy, demanding maximum snowshoe surface area. Warmer, wetter snow found in maritime regions and during spring packs more densely, supporting weight with less flotation required.
Wind dramatically impacts surface conditions through wind slab formation. Wind-pressed snow creates supportive crusts allowing undersized snowshoes to function adequately. However, venturing off these wind-affected areas into protected forest pockets where snow remains unconsolidated can reveal inadequate flotation quickly.
Recent snowfall depth matters more than total snow depth for flotation requirements. Twenty centimetres of fresh snow atop a consolidated base demands more flotation than the same total depth from multiple smaller snowfalls that consolidated between events.
Frequently Asked Questions
❓ What size snowshoes do I need for 180 pounds (82 kg)?
❓ Can I use regular winter boots with snowshoes in Canada?
❓ How much do good snowshoes cost in Canada?
❓ Should I get aluminum or composite snowshoes for Ontario trails?
❓ Do I need heel lifts on snowshoes?
Conclusion: Finding Your Perfect Snowshoe Match
Determining what size snowshoes do I need ultimately depends on honest assessment of your total weight, typical snow conditions, and intended terrain. Canadian winters offer extraordinary diversity—from the Maritime provinces’ wet snow to the Rockies’ legendary powder—requiring thoughtful equipment selection matched to your specific circumstances. The guidelines and sizing charts provided here give you the framework, but personal preference and experience fine-tune the final choice.
Remember that slightly larger snowshoes cause less frustration than undersized ones. You can adapt your stride to larger snowshoes, but you cannot force inadequate flotation from small ones. Start with sizing recommendations matching your calculated total weight, then adjust based on your predominant snow conditions and terrain. Most snowshoers find their “sweet spot” within one size range after a season or two of experience.
As you venture into Canada’s winter wonderland, properly sized snowshoes transform potential frustration into genuine enjoyment. Whether you’re exploring Banff National Park’s spectacular winter trails, discovering Gatineau Park’s groomed routes, or pioneering your own paths through prairie or forest, the right snowshoes make every step a pleasure. Embrace our magnificent winter season with confidence, knowing your equipment serves you well.
✨ Don’t Miss These Exclusive Deals!
🔍 Take your winter adventures to the next level with these carefully selected snowshoes available across Canada. Click on any highlighted product to check current pricing and availability on Amazon.ca. These tools will help you create authentic winter memories your family will love!
Recommended for You
- 7 Best Women’s Snowshoes for Camping Canada 2026 Guide
- 7 Best Snowshoes for Winter Camping Canada 2026
- 7 Best Winter Camping Socks in Canada 2026 (Expert Tested)
Disclaimer: This article contains affiliate links to Amazon.ca. If you purchase products through these links, we may earn a small commission at no additional cost to you.
✨ Found this helpful? Share it with your friends! 💬🤗